EXACTLY HOW WE DIY'D OUR WOOD FLOORS
Paige Hull
The Great Room in the Boho Cottage is one of my favorite rooms. It makes a statement with its length and the beams lining the ceiling and, at the same time, has a number of cozy little corners that are perfect for quieter moments for our guests. It can fit anything from a dinner party for 30 that fills the length of the room, to a workshop for 50 with theater style seating, to a small family gathering that provides plenty of space to lounge on the couches by the fireplace. It’s not easy, though, to design a room that can be used in many different ways.
One of the biggest challenges we came across as we were designing the Boho Great Room was the flooring.
We knew we wanted the floors to look lived in and our initial thought was to use reclaimed wood. But, finding enough reclaimed wood for 900 square feet without spending a fortune is close to impossible, so we did it ourselves.
We decided to pair white walls with a white floor. The intention was to create a space that allowed brands and businesses to have a clean canvas to use as a backdrop allowing their own coloring and details to pop. We loved the look of reclaimed flooring that had been painted many times over the years with the worn edges from a stained floor peaking through. Smoot researched options and decided to work with Lumber Liquidators because they offered unfinished New England white pine in 8” planks for an inexpensive price compared to the other companies he had found.
step 1
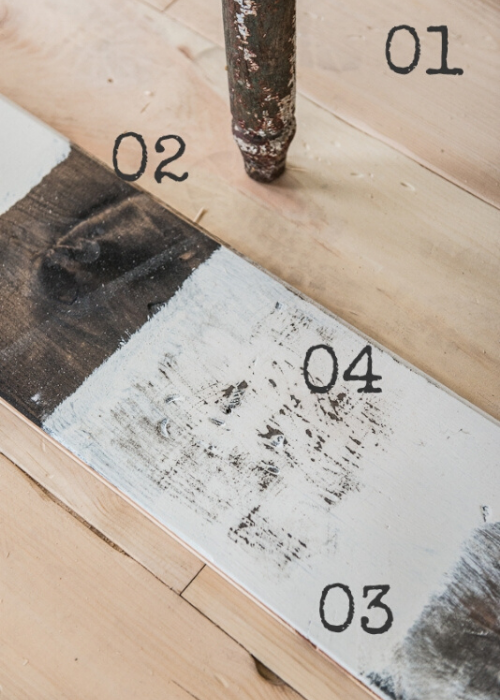
First, Smoot and the kids distressed each piece of new flooring with chisels, hammers, chains and sanding. All of the digs and rivets you see here are from the distressing they did. (We joke with the kids that we taught them a skill they may use again in the future!?!) The goal is to make it look organic by not duplicating the aging techniques on each board.
step 2
Next, we stained the entire floor. It was a little tough, because we had to go through each piece and make sure all the cracks and crevices were covered. We chose a darker stain so it would pop more through the white paint.
step 3
Third, we painted over the stain with a white high-gloss paint. I know…all that work we did to stain the floor and then to just painted right over it! Luckily we had tested the process before and knew it would create the effect we were looking for. We used the same color paint for the walls and floor, so wanted to use the glossy paint for a contrast and needed it to be really durable since we would be hosting events with lots of traffic.
step 4
Lastly, we went back over the white paint with a sander in certain areas so that the stain we worked so hard for shined through. Even though it was a lot of hard work, we love the distressed painted look of the flooring. And we love that it was much more affordable than covering the entire room in reclaimed wood. While we always try to reuse and re-purpose materials, sometimes it doesn’t fit in the budget and you have to get creative.
a couple tips:
Make sure you use water based stain if you are using water based paint, or oil with oil. We learned the hard way - the water based paint was having a hard time sticking to the oil based stain, thus having to repaint the floor twice (ugh!).
I used a brush to apply the white paint (even though a long roller would have been a thousand times easier) to get that authentic look and made sure to brush each board separately.


